
 It’s been quite the eventful September. The big news of the month is that we hosted our first Natural Building Workshop at the homestead. It was, in a word, wonderful. We had a very diverse group of 10 folks come out to learn all about cob, light clay straw, clay plaster, and clay paint. I couldn’t have asked for a better group. I’m continually amazed at the positive energy that is generated through these workshop experiences.
One of our projects was building the light clay straw walls of our new outhouse, which I’d like to document a bit here. This is an outhouse that will serve future workshops and large events (as well as being quite useful for just ourselves, too). The building is also a little bit of a “natural building showcase”, as it will have a few different types of natural finishes on display when all is said and done.
Read ahead to learn about how to build a light clay straw wall.
Wall Framing
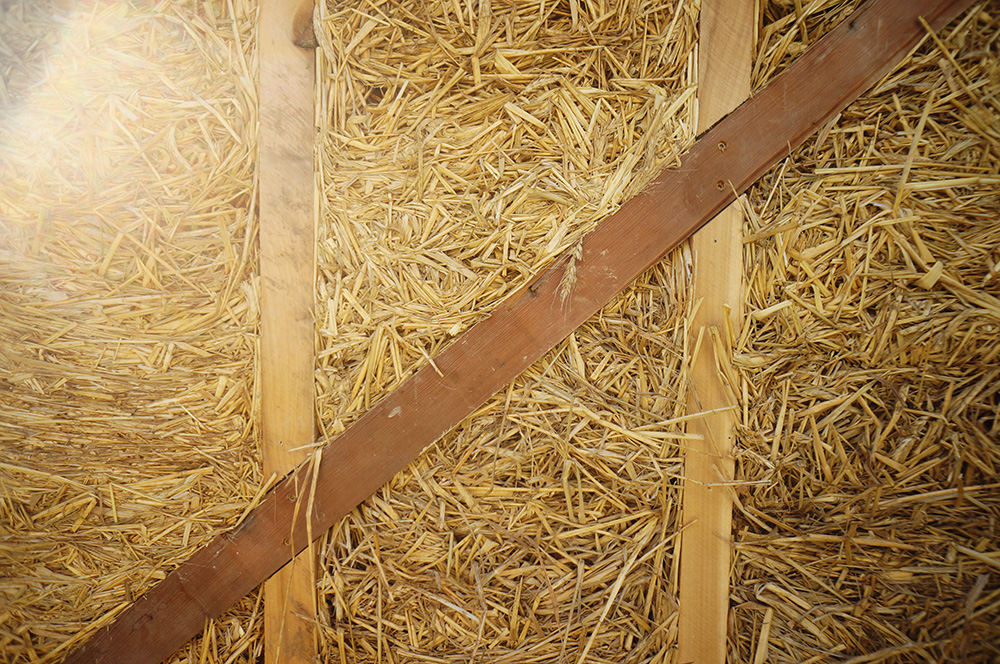
Let’s look briefly at the framing of our outhouse. We used local rough sawn poplar for the majority of the frame. The wood was unseasoned. Many of the sticks warped in the few days between the time that I picked them up and when we used them. Green rough sawn wood can be challenging to use, but there are some tricks. We framed the outhouse 18″ on center, which worked well with our 5×12 building dimensions.
Since this is merely an outhouse and doesn’t really need insulation in the first place, 2x4s are totally appropriate for the framing. Bigger buildings can be built with truss walls to increase the thickness of the insulation beyond 2×4 or 2×6 dimensions. Look up Larsen truss walls if you’re interested in learning more about that.

A look at the outhouse framing with rough sawn poplar lumber
Building Light Clay Straw Walls
Light clay straw (a.k.a., light straw clay, straw clay, slipstraw, and “damn this material needs a more distinct name”) is a very simple material that can be stuffed into a wall cavity, providing some amount of insulation and moisture moderation. It’s also a good substrate for natural plaster, and it can be used in a variety of applications — as exterior or interior walls, and in a variety of widths.
The first thing we did was nail 1×1 wood keys in every stud cavity. These vertical keys help hold the light clay straw in place while the wall is being built. These 1x1s are simply centered on each stud and nailed in place. Simple and effective.
Stuffing the walls is a simple affair. You simply screw plywood on either side of the wall as a formwork. Working no more than 24″ in a single lift is a good idea — and also a good use of plywood, since you can rip a sheet right in half. Don’t skip any studs when you screw in the forms, otherwise a bulge in the wall may form as you tamp the straw in place.
How to Make Light Clay Straw
Making light clay straw is terribly simple. As with anything, there are different ways to make it, and different consistencies depending on what you’re aiming for. If you want to build a wall with as much insulation value as possible, the straw should have just enough clay to bind the material and no more. If you want a strong, dense wall and you’re not as concerned about insulation, you can use more clay in the mix.

A wheelbarrow is fine for small batches, but you’ll want a more substantial system for larger projects
Basically, you fluff up a few armfuls of straw (wheat, rye, oat, or rice straw will suffice) and add a small amount of clay slip, tossing the straw until each strand is sufficiently coated. You can make a wheelbarrow load in a matter of a couple of minutes, or toss larger batches on a tarp. The clay slip should be about the consistency of heavy cream, without any chunky aggregate in it. (Screen your clay if you have stones or other particulate matter in there.) Clay slip can be made by adding clay and water to a bucket or barrel, and using a drill with a large paddle to break up the clay.
That’s really all there is to it. The choice analogy is that it’s like tossing a salad with a vinaigrette dressing — each straw should get a nice visible coating, but not so much that it’s anywhere near sodden.
Successful Straw Stuffing
Starting at the bottom of your wall, add straw to each stud cavity and tamp the material with a length of 2×4 or another stick of your choosing. Be careful to tamp the straw good and well in the bottom corners and at the sides. If your building has let-in bracing, you need to be extra careful to do a good job around the braces as well. It’s hard to convey in words, but you want to tamp the material thoroughly without going overkill. Again, depending on what you’re aiming for, you might choose to do a light tamping (to increase the amount of air space in the wall, which is how you improve insulation values.)

Loading light clay straw into the wall cavity
You should do two “courses” of straw before you remove the bottom-most form. People are always surprised to learn that you can remove the formwork that same day, even that same work session and the straw will hold its shape. Yes, it’s true — the main thing is that you should alternate your plywood forms so you always have a certain height of wall supported as you continue upwards.

A nicely packed section of wall
A well-packed wall is very easy to pick out. It should be flat, uniform, and without any “hairiness”, or straw popping out of the plane of the wall. A loose wall will be difficult to plaster and may need to be re-done, or at least repaired.

Tight work!
The most difficult parts of stuffing light clay straw are small framing cavities and the top of the wall. The top of the wall can be done in a variety of ways. Here is one possible method: when you’re close to the top of the wall (between 18-24″ from the top), keep your formwork in place and install a 8-10″ tall piece of formwork at the very top of the cavity. Stuff the straw upwards into the cavity, and then close up the section between the very top form and your previous form. Keep these forms in for a longer period of time to ensure a tight pack.
Prepare to do a lot of screwing and unscrewing, particularly in a small space with lots of irregular cavities. This would be a good time for me to give a hearty nod to the mighty torx head screw. There are enough reasons to never touch a phillips head again (particularly for construction at least), and here’s yet another.
What Comes Next?
Your walls are stuffed and lookin’ good. Now what? Well, it’s time to think about finishing — the next step is making and installing all of your wood trim before you put any plaster on the walls.
Thanks for reading! And thanks to the Natural Building Essentials 2016 crew!

Stuffing complete!
From the pictures it appears that there is no key on the face of the board where the straw clay is meeting it. Will there be a gap as the straw clay dries and shrinks away from the wall?
Sorry, I was referring to any post that the straw clay is adjacent to. Where the straw clay meets the post I would imagine it would move away from it when drying, which would leave a gap between the straw clay wall and the post.
@Ryan Wheeler — What board are you referring to?
Hi Ryan:
The straw tends to stay tight to the upright studs, but it does sometimes pull away from the top plate… not a huge problem, since you can stuff more in later if necessary.
Thanks for the great information. How much clay would you say you used between doing the straw clay walls and the plaster? Do you have an estimate per square foot of wall? Or know of a resource that we could use to estimate the amount of clay needed?
Hey Ryan: I don’t really track clay usage. Interestingly, clay doesn’t actually add any volume when you mix it with sand for plaster (or cob, a floor, etc.). That’s because the particles are so small that they find their way between all the particles of sand and disappear, in terms of volume. But you can still calculate how much clay (and sand) you need by doing a simple calculation — depth of plaster x square footage of wall. So 1/2″ of plaster x 500 square feet of wall, for example, is:
.5/12 (convert inches to feet) which is 0.0416.
Then 0.0416 x 500 sq. ft. = 20.8 cubic feet. There are 0.66 cubic feet in a 5 gallon bucket, so that’s 31.56 buckets of sand. If your plaster is 2 sand to 1 clay, assume you need 15-16 buckets of clay. Make sense?