
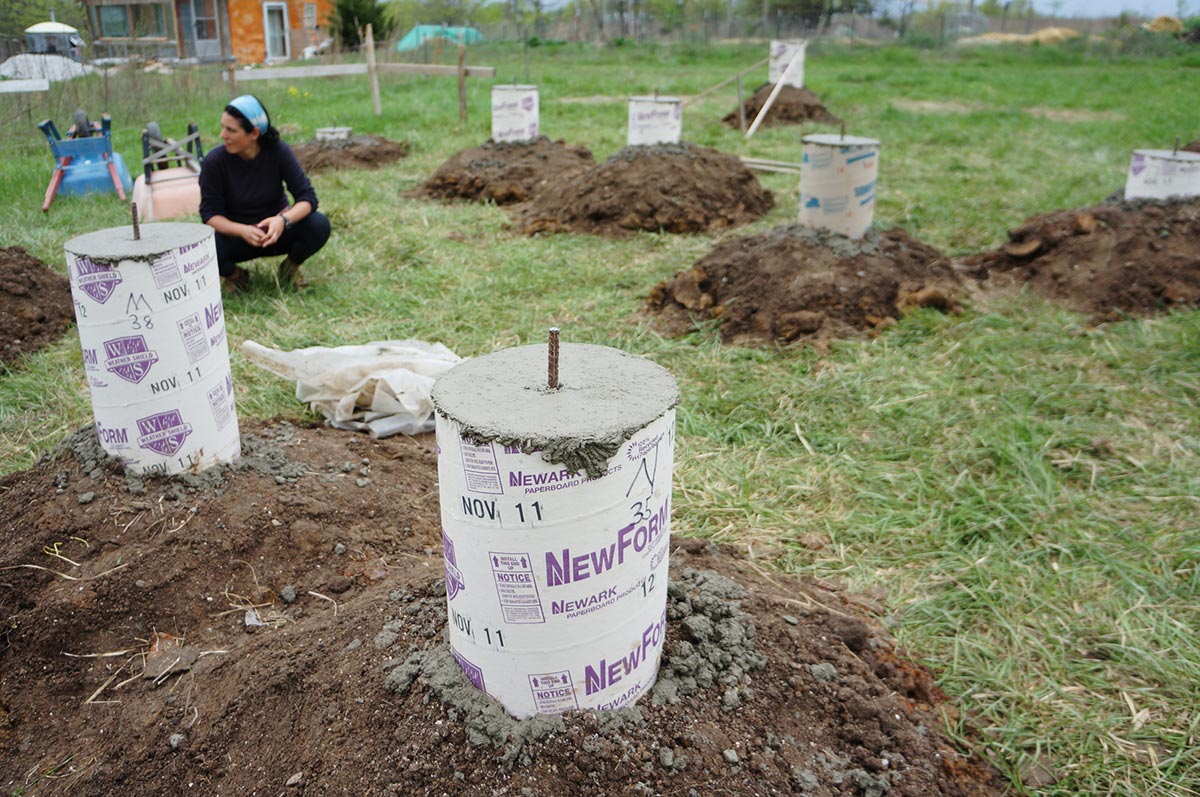

The completed concrete pier foundation
Two days ago, we completed the concrete pier foundation for our new straw bale house! Yahoo! In eight hours, and with pretty intense labor, we managed to get our holes dug, our concrete piers poured, and finally, revel in the excitement of having a finished foundation for our current house project.
In this first how-to article, I’ll describe how we prepared the site and transferred our foundation plan to the ground using batter board layout. I’ll also explain why we chose a concrete pier design for this building.
Why We Chose Concrete Piers
The choice to use concrete was not an easy one for me. I’m actually not a big fan of the material (surprise, surprise). Concrete manufacturing is highly polluting, and the embodied energy in the material is likewise pretty intense. Not to mention, it’s non-biodegradable (a huge negative for me), so all of those buildings, roads, driveways, etc. around these days…? They’re not going anywhere. Well, until they crack and fail, and the concrete gets hauled away to a dump, anyway. And believe it or not, concrete is the second most consumed substance in the world, next to water.
(Note: yes, you can use recycled concrete. It’s called urbanite! It’s what I used to build the foundation for my cob house, and our cooperative kitchen.)
However, the perceived benefits of poured concrete piers outweighed the cons in this case. Here are the main reasons why I chose this design over the alternatives:
- Getting the house up off the ground in this humid environment was a priority — we don’t want any moisture problems that can come with ground contact! That meant piers, which are usually concrete, or sometimes wood.
- It’s quick (which I don’t always put a priority on, actually, but this time it was).
- Concrete will last forever (which is usually a negative quality for the material, in my opinion, as you can see above), which will complement the durability of the rest of the design well (timber frame, etc.)… Wood piers would have to be replaced at some point, and that doesn’t sound like a pretty job to me for such a heavy house.
Planning for the Post and Pier Foundation
Obviously, before we were able to dig holes and pour the piers, we had the figure out exactly where they would be positioned, and how tall they would be. That’s where batter boards and the good ol’ 3-4-5 triangle rule came in handy. Batter boards are horizontal, level boards attached to temporary corner posts to help determine the layout and square of a building.

The pier foundation plans, with pour tube lengths notated at each point
Using Batter Board Layout
With the foundation plan in hand, all we had to do was transfer the measurements to real life. We drove corner posts for the batter boards into the ground wider than the actual dimensions of the house. This was to account for the eventual ease of tweaking things, and having extra space to work with. And after determining how tall the SHORTEST pier would be (in this case, at the highest point on our plot, the northeast corner), we screwed in a level 2×4 to our sturdy corner posts. We set the top of the board 12″ above grade, knowing that the opposite corner was a good two feet lower on the southwest side of the house site. (Also, 12″ above grade is high enough for the future sill beam to avoid getting wet from rain.)

Looking through the scope of the builder’s level
Next came the builder’s level. Having three people here came in handy — one to look through the scope, another to hold the stick, and a third to actually make a pencil mark on each corner post. Setting the stick on our pre-determined northeast batter board, we got a measurement off of the stick that we simply transferred to the remaining posts. Once that was said and done, we could screw in the remaining horizontal boards and run strings from corner to corner. The strings now represented the level of the foundation.

Other important layout tools of the trade: the builder’s level stick and a 4 foot level
Achieving a Square Layout
After some finagling, we determined square for our building. First we spaced the strings the correct distance apart in both directions as best we could. Using the good ol’ a²+b²=c² rule, we determined the length of the diagonal of the house. (In this case, almost 34′ exactly. The east-west length is 31.5′, and the north-south is 13′.) Running a tape measure from corner to corner (again, three people come in handy here), we could check to make sure both diagonals measured the same distance, and adjust the strings as necessary.

Batter board layout with string, and final pier positions marked with short green stakes
It was very helpful to attach a screw to the batter boards to which we could tie off the string. When it came time for the eventual tweaking, we could make fine adjustments to the string without unwrapping the whole string, and simply slide it along the board.
It takes some annoying back-and-forth to really nail down a perfect square. Eventually, we got it, but not without some head-scratching and fine-tuning. It’s helpful to have at least one side that you do not touch, and work at the two opposite corners instead to establish the layout.
Transferring Exact Pier Locations to the Ground
Now that we had our square and level string layout to work with, we could establish the exact pier distances and locations on the ground itself. Working from one corner, we simply measured along the string to determine where the piers would fall, and then tied off short lengths of string at the exact point once we got the distance. (It’s important to note that you should always measure to the same reference point — in our case, we measured to the northeast “corner” of our 12″ round piers.) Once we double-checked our work and felt good about everything, we could finally get those points onto the ground itself to bullseye where the holes would be dug. That was as simple as using a plumb bob, and holding it to our string points, steadying it, and then marking that point on the ground below with a short wood stake. Eventually we dropped a small pile of ash, too, for the auger bullseye. Viola!
Measuring up from the ground to the string, I took note of the rough heights of the piers. For that original northeast reference point, I noted the exact height, and wrote it down to use later as our reference mark (on the concrete pour tube itself) to check with the builder’s level for a second time. Since we used concrete pour tubes, I added about 5″ extra to these measured heights for extra tube height when sawing them to length. Tip: don’t plan on cutting the tubes to the exact height right away — once they are positioned on the ground, you can use the builder’s level a second time and cut the tubes in place to the exact proper height.
Time to get the strings out of the way, and start digging holes!
Read for part two? Keep reading how to build a concrete pier foundation.
Congrats!especially on being able to embrace the ever evil CONCRETE ;
in certain tasty applications,it’s great to have I always say RALLY against new freewaybridges, and use a few hundred pounds of concrete for ART or delicate
bottle walls, or …….anything!
Check out FIBER applications for concrete,and use rusty nails and other common hardware scrap to create super strong crete
and GRADE BEAMS are real cool!! we used some to dial in a natural refrigeration system in a good way!
Look forward to seeing you completed project!!
Nico
I’ve been planning to build with piers for years now! I hope that we’ll be able to build our home ourselves, debt free this year. Thanks for the article!
I’m curious as to why your disdain for concrete? It’s made from all natural materials, limestone, shale, iron ore, and sand. Then mixed together in a mill with a dust collector – some water added later obviously 😉 One could say you’re recycling ground up rocks…
Well, more specifically, it’s the cement in concrete that is a real ecological drag. It is far from “natural”, as it requires huge amounts of energy (largely fossil fuels, especially coal) to produce. The process is highly polluting and destructive. The embodied energy is pretty massive, and busted concrete goes largely unused and is not easily recycled.
http://www.treehugger.com/green-architecture/cement-the-unheralded-polluter.html
http://www.theoildrum.com/node/4162